Back at it, another brisk weekend on site on Saturday 22nd March 2025. Regular volunteers Janet and Jeff, Paul, Andy and Chris. Still in early days of the year, visits and events wise. So some maintenance jobs and chasing up plans for bigger repair efforts to come.
All of which have been greatly assisted by the support of South Yorkshire’s Community Foundation through their grant towards our site insurance costs to undertake activities this year.
Hitting the garden in Pump House Cottage, Janet and Jeff are doing sterling work, weeding, cutting back, and tidying up the brick paths weathered over the winter.
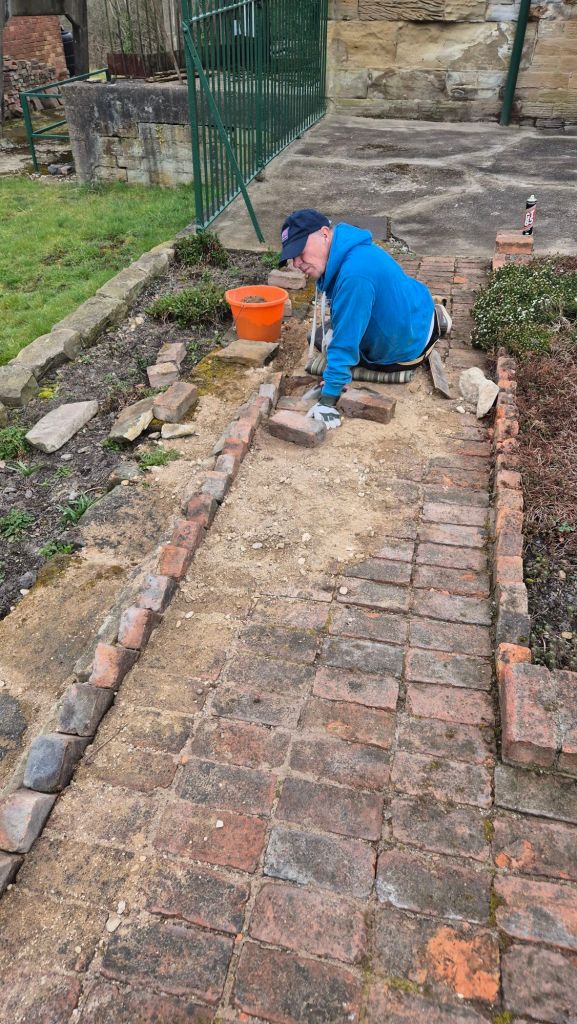
As well as replacing fractured bricks, Jeff started to reset the decorative edging of the path.
Wonderwalls
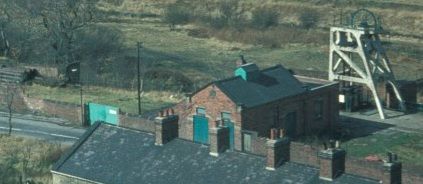
It’s all about Bricks! Aside from sandstone, the main material visible at Hemingfield is definitely the humble brick. 19th and 20th Century examples abound. We certainly have many bricks, not all of them are in their rightful places – especially out front, in the boundary wall on Wath Road:

What happened? Well, staying within the bounds of moderation, criminal damage happened. A significant chunk very likely by one individual, and mostly after 2019, but also other uninvited guests over time did not help matters.
Compare the above March 2025 image with this one below from August 2016:

This step back into the not-too-distant past shows quite a contrast in terms of showing the loss in height of the wall:

Can you help?
As for repairing/restoring the wall, we will need quite a lot of help! None of our excellent volunteers are qualified or experienced bricklayers. We have the materials and tools, but need to secure the expertise and permission to move forward.
Just another brick in the wall?

Before any work can begin, we are seeking to record the front wall construction to determine the appropriate methods and materials.
Brickbats and mortar
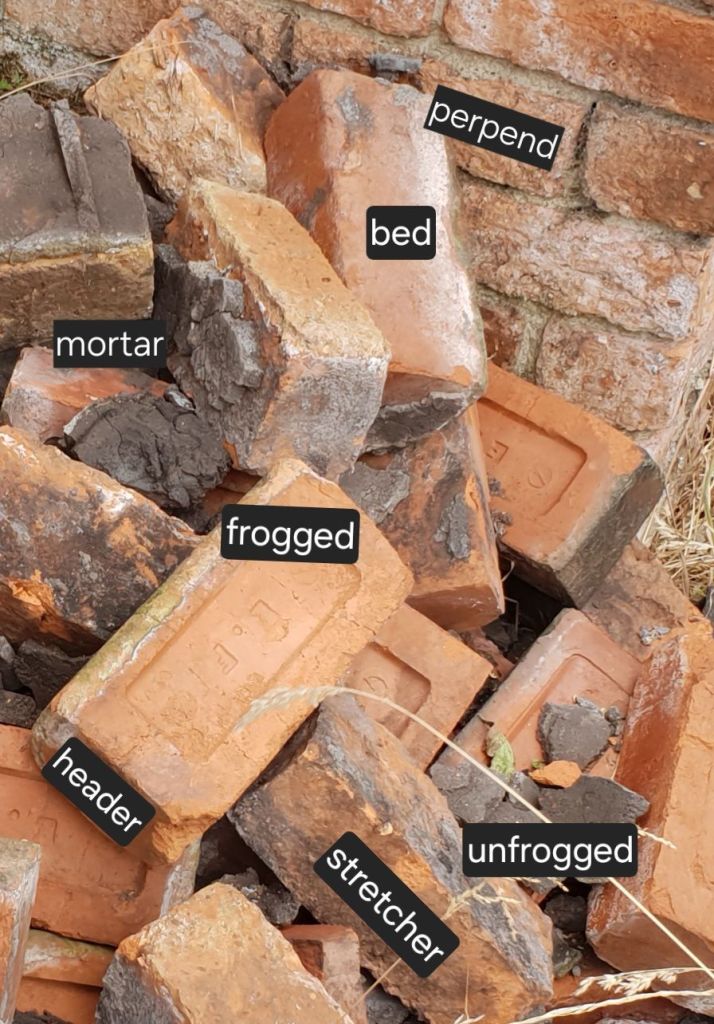
In most simple brick walls, the bricks are laid in rising rows (courses) of blocks, usually of the same standard size and colour. Each vertical stack of bricks in the depth of the wall is known as a wythe. Brickwork seen front-on shows different methods of bonding patterns in the courses, used for particular structural or decorative purposes, and generally consisting of headers (thin end of brick facing out) and stretchers (long side facing out).
The mortar holding them together usually sits on the top and bottom faces (beds), forming horizontal bed joints, whilst the mortar forming the vertical joints on each end forms what are known as perpends. From the 19th century many bricks are frogged, that is they have a depression in the top or bottom face (bed) to hold more mortar for adhesion, and which is also often used for advertising the brand of the brickmaker. Doubled frogged means the top and bottom both have this impression from the pressing of the original clay brick before it was fired.
Pointing refers to the use of mortar in connecting the bricks building the wall, its thickness, depth and material, e.g. lime mortar, cement mortar, with additives of various sorts reflecting local practice or just the immediate availability of materials.
In context
The surviving boundary wall at the Wath Road entrance can be seen as consisting of 6 sections:
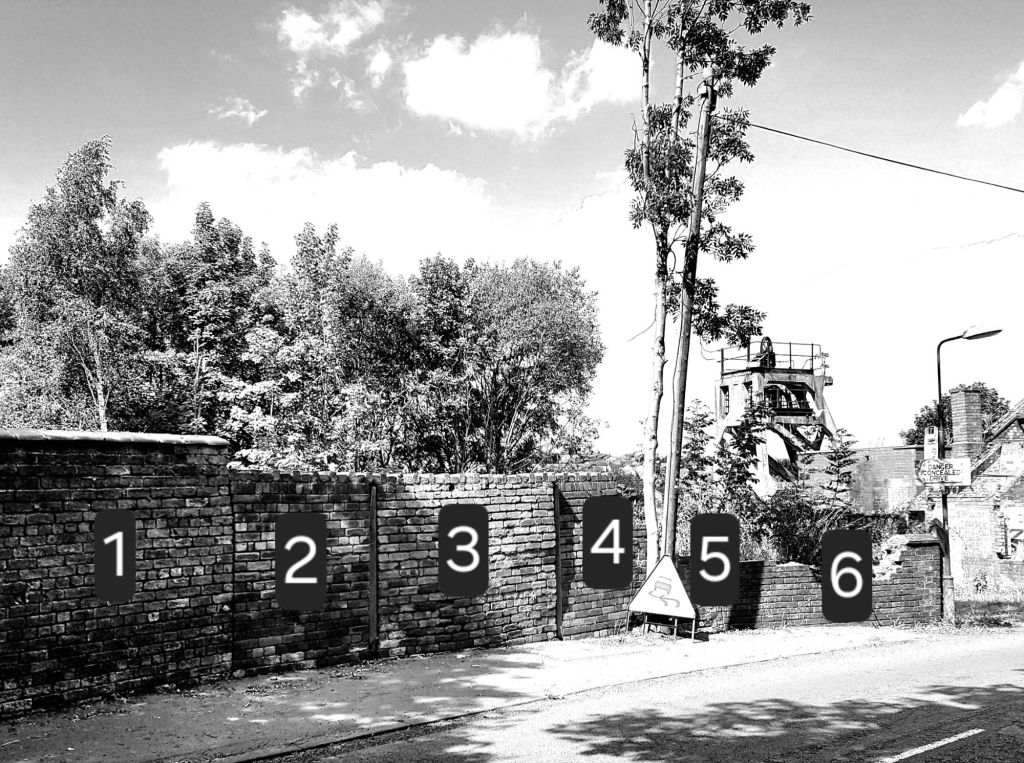
A brief look at each of these sections reveals some interesting insights into the history of the site throughout its pit and pumping station years, pre- and post- 1920.
- Solid and stable high wall, 24 visible courses high on Wath Road side. 1½ bricks deep, or 3 parallel stretchers, capped with Skiers Spring terra cotta tiles which were also used on the majority of the boundary wall until demolished and replaced in the 1990s. Generally Common English garden wall bonding, that is 3 courses of stretchers (side full length of brick) and one of headers (short top side of brick). Seemingly heightened at some stage and showing a mixture of mortars and at the rear a greater greater variety of darker pressed bricks.
- Butt joint with section 1. 22 courses high originally (up to 2019), 6 stretchers wide, 1 brick deep, with a top ‘castellation’ decoration which was continued across sections 2-4. Also has rear buttress after joint with section 1 which has an anchor plate and iron tie bar. Bonding is a variation of Common English garden wall bond at the bottom, then a space of 6 courses of stretchers and another of headers. Poor mortar mix and strength, explains the extent and relative ease of damage seen here, mortar possibly mixed with coal dust as a grit.
- Vertical timbers either end of section, 10 ½ stretchers wide. 1 brick deep. Top castellation’ decoration continued from section 2 into 4 over both timbers on a thin diminishing row left-to-right. Uneven pointing, and less care in bonding work than sections 1, 2, 4,or 6. Some noticeable bulging and lean.
- From the vertical timber of section 3, 22 courses high, 1 brick deep, now a leaning section due to the tree growth behind the telegraph pole, (similar to 5 into which it is badly bonded). Until more recent years this section included 2 step-downs in height to section 5, dropping 3 bricks, then 4 then 3 in height to meet section 5 at the height of section 6’s coping.
- Bonded joints with 4, at an offset angle behind the telegraph pole, noticeably paler brick. Rear of wall shows evidence of rebuilding/repair. Movement in the section and sections 3-5 led to buttressing and seemingly repairs in the past exacerbated by tree and felling in 2023. Right-hand side ends in a butt joint to 6. This section marks the edge of where there used to be a separate building on site, facing the road, seen in early 1900s image of the pit.
- This section is about 17 stretchers wide, 1½ bricks deep, with bonding matching the wall on the opposite side of the gate post, and similar to section 1. In June 2009 it retained 6 stone coping pieces, but by September 2011 all bar one of these had been removed. The Friends took on the site in 2014.

Pole position
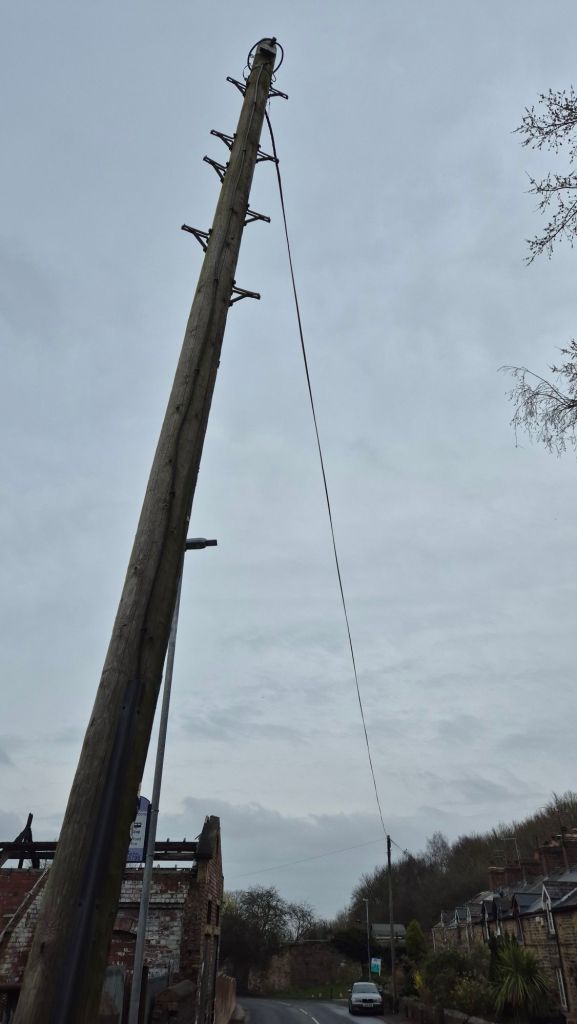
The prime cause of problems for much of the wall at sections 4 & 5, even after vandalism, relates to the telegraph pole, or rather the tree which grew behind it, levering the wall and pole in opposite directions.

For many years the tree had been pushing the pole towards the road, creating significant ‘play’ in the pole (it would move if pushed), as well as noticeable sag in the drop line wires over to Pit Row cottages. It had also been weakening the boundary wall, pushing it backwards.

After 2014, as the Friends secured the site with steel fencing on the damaged wall and filled gaps with wooden fence panels, we were also attempting to prop and stay further movement.

This situation came to a partial end in September 2023 when the huge tree was professionally cut down, thanks to the crew from Barnsley Council. This task was difficult to do without causing further weakness and lean on the boundary wall, and required increased propping in the yard at sections 5 and 4 in particular.
Leaning and the lamppost

All of which brings us up to date. In December 2024, a new tall light column replaced the old smaller one by the concrete gate post, however this has negatively affected the surface run off when rain water runs off the road.

In March 2025, the telegraph pole itself came in for attention, being tested and marked with a A1024 defect label notice. But what does that mean? And what are all the labels and numbers on telegraph poles all about anyway?
Unwanted knowledge, or telegraph pole appreciation
Most active timber telegraph posts in the UK connecting to customers properties for telephone and data services via drop wires should have:
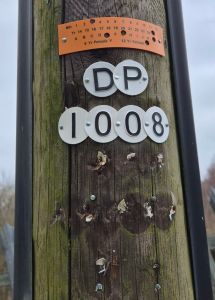
A) A designated number relative to the telephone exchange area (DP being a Distribution Point or pole, black letters on white plastic tiles), possibly fed from a nearby BT/PO/GPO footway cover box, otherwise it may just be a linking carrier post. Prior to plastic being used in 1963 numbers and letters were shown on enlarged metal nailheads or punched on metal strip.
Additional letters & numbers may appear below DP referring to a transposition code and serial number. This information used to be put c.8 feet high.
Other letters on their own, usually on coloured squared aluminium tiles 45mm x 45mm, which may alert visiting engineers to pole hazards and climbability, e.g. red D (Do not climb, use a MEWP – mobile elevating work platform or scaffold), there should be a red date label with the D; green C (Shallow Climable, with guidance), red SD (Shallow Depth pole), orange H (Hazard, within 1m for climbing, such as nearby spiked fencing, use MEWP) or green Z (Safe Climb Zone Pole, accredited climbers only or use a MEWP).
B) A plastic coloured test label (also known as a A558 label), in use since 1964. It consists of 3, or more likely 4, rows with punched holes recording the last test data:
1. A number to indicate the Month of the last major pole test. (Mth): 3= March
2. The Year of the pole test (Yr): 25 = 2025
3. Letter code – represent the pole tester who performed the test (thank you mystery tester!)
4. Two options on the next test cycle, 6 or Twelve years: 12 years.
We know ours was last tested in 2016, so it was less than 8 years since the last year.

Why the A1024 defect? Probably the wobble, or the slack dropwires.

A further engineer visit appeared to add some stabilisation to the pole and tightened the dropwires, so no more defect.
We haven’t mentioned the other BT labels seen, an A559 maximum pole loading label which should give a limit on the number of radial dropwire connections at the top of the pole. Also, at the foot of the pole – Openreach engineers may attach a pre-climb test label when they carry out an inspection and this level records the test date and serial number.
Cracking the code
The timber telegraph pole themselves usually have further markings (branding or impressions) reflecting their form, function and origin.
E.g.

Depending on the age of the pole, the letters should be 10ft or 3 metres from the butt of the pole – which for modern poles should be 1.2 metres in the ground. A scored doby line may mark the 3 metre point, and a horizontal ground line may be visible at the rear of the pole. Additional marks on the butt of the pole would only be visible to depot and installation staff.

These denote:
- Owner of the pole – GPO/PO/BT
- Pole length and Class (feet for older and metres for newer poles 10 or 28 feet might be common examples. Classes include: XL = Extra Light, L = Light, M= Medium or S = Stout
- Year of preservation (timber treatment) e.g. 57, 97 not year of installation, but clearly it must be after this date.
- Supplier mark and type of wood/preservation treatment – Not all poles of all ages show this, but as an example, 2I = supplier 2 and Imported I – if this info is missing, it is generally safe to assume the wood is Scots Pine and that it was creosoted through the Ruping process.
List of supplier/depot numbers and wood type codes:
Supplier depot codes
1 – James Jones (Supplied BT until 1998)
2 – Calders & Grandidge (1930s-current supplier)
3 – BBH (Burt, Boulton and Haywood, current, now Scanpole)
4 – PTG (supplied BT between 1997-2000 taken over by Scanpole)
5 – Scanpole (supplied BT 2000-2006)
6 – Scanpole (supplied BT 2000-2006)

Additional creosoting treatments may be recorded in further two year digits below the first. Pole re-use and shortening from the tip or the base may also lead to obliteration and new markings.
Our thanks to enthusiasts, General Post Office telephone engineers in years past, Robert Freshwater’s phenomenal Telephone File website and the Telegraph Pole Appreciation Society. You never know what you never wanted to know!